(成果)

教學開始:
先下載初始檔,打開專案並選擇Main.storyboard
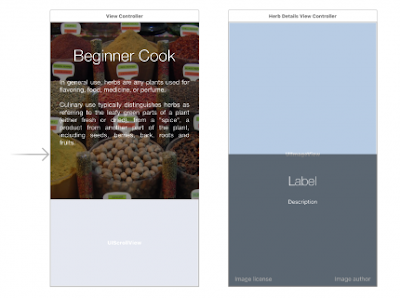
第一個試圖控制器主要是秀出scrollView內容在滾動時herbsModel裡的值
當主ViewController 無論點擊哪張圖轉頁到HerbDetailsViewController,能夠將View Controller的image帶到HerbDetailsViewController的背景上
在專案文件上基本的頁面轉換已經寫好,在執行後會是像以下這樣
自訂轉換場景的背後:
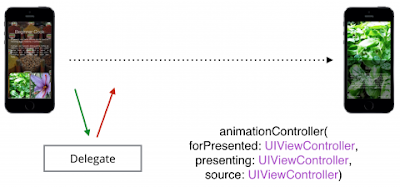
當如果UIViewControllerAnimatedTransitioning 回傳時,則UIKit 會呼叫imationController(forPresented:presenting:source:),如果方法回傳為nil時,則是會以內建的做回傳,假如UIKit 收到時 會以UIViewControllerAnimatedTransitioning的物件來替代,然後UIKit使用此物件動畫控制來做轉化
UIKit使用自定義動畫控制器前有一些步驟
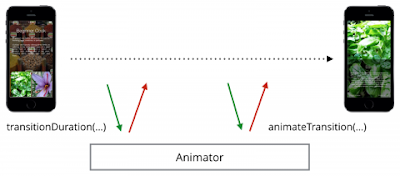
UIKit首先訪問自製的動畫控制器會先呼叫transitionDuration(using:)然後在呼叫animationTransition(using:),當你是要自定義動畫時則會要中間的過場
以上運用的原理介紹到這,相信網路上則會有更多的資訊,讓我們直接開始一步步完成吧,
首先我們在專案上自建一個類別,名字為PopAnimation,這是要做自定義中間過場的類別,
建立完後打開它,加入protocol如以下:
class PopAnimator: NSObject, UIViewControllerAnimatedTransitioning {

}
輸入完後Xcode會跟你說你還要在加入2樣方法,分別是func transitionDuration(using transitionContext: UIViewControllerContextTransitioning?) -> TimeInterval {
return 0
}
func animateTransition(using transitionContext: UIViewControllerContextTransitioning) {

}
以上是自定義動畫控制必要的方法,接下來我們來看主頁面ViewController打開ViewController.swift,我們要加入擴充如以下的程式碼
extension ViewController: UIViewControllerTransitioningDelegate {

}
加入擴充主要是因為轉換的delegate protocol關係,找到didTapImageView(_:)加入以下的程式碼,來設置轉換的delegate到herbDetails頁面上
// ...
herbDetails.transitioningDelegate = self // <-- Add this line
present(herbDetails, animated: true, completion: nil)
接下來把剛剛自定義轉場的PopAnimator加進來吧,程式碼:
let transition = PopAnimator()
這是要將預設轉場動畫替換這個自定義的動畫控制器
現在加入delegate方法到剛剛擴充的ViewController裡
func animationController(forPresented presented: UIViewController, presenting: UIViewController, source: UIViewController) -> UIViewControllerAnimatedTransitioning? {
  return transition
}
這裡主要是回傳自定義動畫控制器,那麼我們有了彈出轉換那麼彈回呢?不急!我們在加入這個程式碼:
func animationController(forDismissed dismissed: UIViewController) -> UIViewControllerAnimatedTransitioning? {
  return nil
}
這時候我們執行後,咦!奇怪沒有發生什麼事情耶,原因是我們還沒告訴控制器要做什麼動畫.
創建自定義轉換動畫
打開PopAnimator.swift,加入以下程式碼:
let duration = 1.0
var presenting = true
var originFrame = CGRect.zero
加入duration是要做轉場動畫的時間,pressenting是要做彈出及關閉轉場的開關判斷,originFrame保留螢幕尺寸,讓視覺上轉場時有種可以放大縮小的錯覺.
現在我們轉移到UIViewControllerAnimatedTransitioning這個方法上,修改transitionDuration(),加上此程式碼,此回傳轉換的快跟慢:
return duration
設定動畫內容
我們用一張圖來表示動畫的內容
(轉換前)
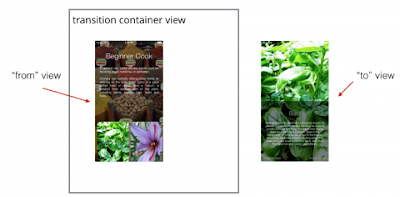
(轉換後)
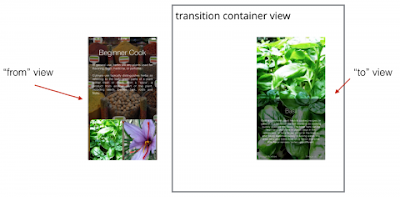
加入淡出動畫
我們來做一個簡單的淡出的動畫,把程式碼加入到animateTransition():
let containerView = transitionContext.containerView

let toView = transitionContext.view(forKey: .to)!
你會在container View得到獲得動畫,然後取的新view存到toView上轉換的交換對象有兩個非常簡單的方法,可以來做轉換播放器
view(forKey:) :透過UITransitionContextViewKey.From和UITransitionContextViewKey.to這兩個參數做新與舊的View轉換
viewController(forKey:):透過UITransitionContextViewControllerKey.From和UItTransitionContextViewControllerKey.to這兩個參數做新與舊的ViewController轉換
接下來我們來加入動畫到container View裡,在animateTransiton()裡加入程式碼如下:
containerView.addSubview(toView)
toView.alpha = 0.0
UIView.animate(withDuration: duration,
  animations: {
    toView.alpha = 1.0
  },
  completion: { _ in
    transitionContext.completeTransition(true)
  }
)
當完成動畫新與舊轉換後,Uikit會呼叫compleTransition()已交完成了.
現在來執行專案試看看,會發覺還可以在更好一點,還差一點,快結束了.XD
(連結第二篇..)

沒有留言:
張貼留言